
Jack Wallen walks you through the process of deploying your own, in-house chat server in less than 10 minutes to make it easier for employees to communicate and collaborate.

Image: Natali _ Mis/Shutterstock
Your business has grown considerably, and it's necessary to empower your employees to more easily communicate with one another. The problem is, you don't want them using third-party tools and platforms for the task. So what do you do?
You deploy your own internal chat server. But how? Fortunately, open source is there to rescue you. With Openfire, you can deploy a powerful chat server in less than 10 minutes on your LAN. Once you have the server up and running, install the Spark client on all those desktops, and everyone can start chatting with one another for better collaboration, without third-party intervention.
I walk you through the process of installing an Openfire chat server. I'll demonstrate how on Ubuntu Server 20.04, but the server can be installed on any Debian-based distribution or any Red Hat-based Linux flavor, as well as macOS and Windows.
SEE: Checklist: Server inventory (TechRepublic Premium)
What you'll need to make this work
You need a running instance of Ubuntu Server and a user with sudo privileges. That's it. Let's get to work.
How to install the necessary dependencies
First, we need to install the Java Runtime Environment; fortunately, Ubuntu includes this in the standard repository. Log into your server and issue the command:
sudo apt-get install default-jre -yWhen that installation completes, you can move on.
How to install the Openfire server
You'll need to download the latest .deb package for the server. If you're on a GUI-less server, that can be done with the wget command like so (making sure to update the command below for the latest release):
wget https://www.igniterealtime.org/downloadServlet?filename=openfire/openfire_4.6.4_all.debOne problem you may find after downloading the file is the filename might be malformed. Instead of openfire_4.6.4_all.deb, it might wind up being something like 'downloadServlet?filename=openfire%2Fopenfire_4.6.4_all.deb'. To fix that, issue the command:
mv 'downloadServlet?filename=openfire%2Fopenfire_4.6.4_all.deb' openfire_4.6.4_all.debNow, you can install Openfire with the command:
sudo dpkg -i openfire_4.6.4_all.debWhen the installation completes, start and enable the service with the commands:
sudo systemctl start openfire sudo systemctl enable openfireYou can now point a web browser to http://SERVER:9090 (where SERVER is the IP address or domain of your Openfire server). You will be greeted by the setup wizard, where you'll need to take care of the following:
Choose language.
Server settings (domain, port, encryption type).
Database settings (Figure A).
Profile settings (where user information will be stored).
Administrator account (email and password).
Figure A

Selecting the database for Openfire.
On the database settings, you can select the default, which will create an embedded HSQLDB database–this is fine for small to medium deployments. If, however, performance and scalability are factors, you should choose a standard database connection. For that, you'll need to install a database server and then create the database/database user. In this installation, we're going with the default.
Once you've stepped through the installation wizard, you'll be prompted to log in with the admin account (Figure B). Note: The admin user is admin.
Figure B
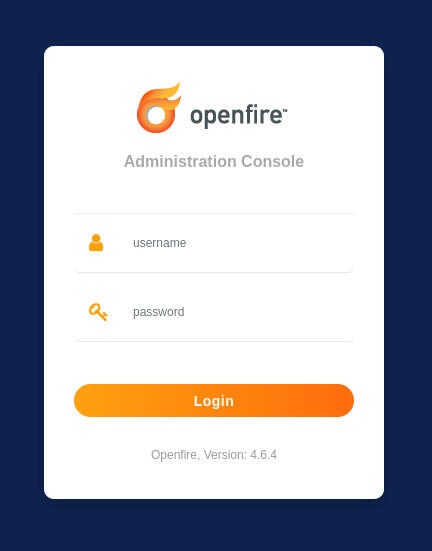
Logging into the Openfire console with the username admin and the password you created during installation.
After logging in, you can start adding users and managing your server, which is all straightforward.
The Openfire client
To connect to the Openfire server, you must use the Spark client, which can be downloaded from the official Openfire download page–you'll find clients for Linux, macOS and Windows. After you install the client on your desktop machines, launch it, and you'll be prompted for a username, password and domain (Figure C).
Figure C
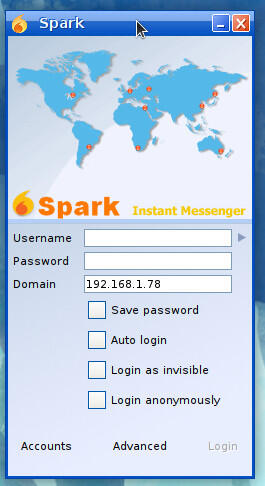
The Spark client for Openfire is easy to use.
As for the Domain, you can use the IP address of the Openfire server. If you find Spark errors out on connection, you'll need to click Advanced and then either disable encryption in the Security tab (Figure D) or enable Use Direct TLS method. I found that using the Direct TLS method worked for me.
Figure D
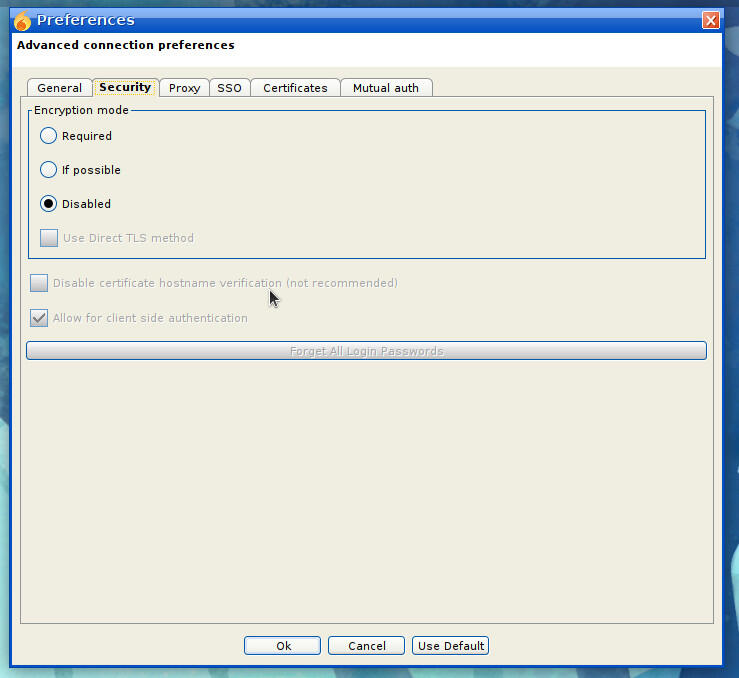
Disabling encryption for the Spark client.
The disabling of encryption is only necessary if you've set up Openfire to work without encryption. You can enable this from within the Openfire admin console in the TLS/SSL Certificates section under Server (Figure E).
Figure E
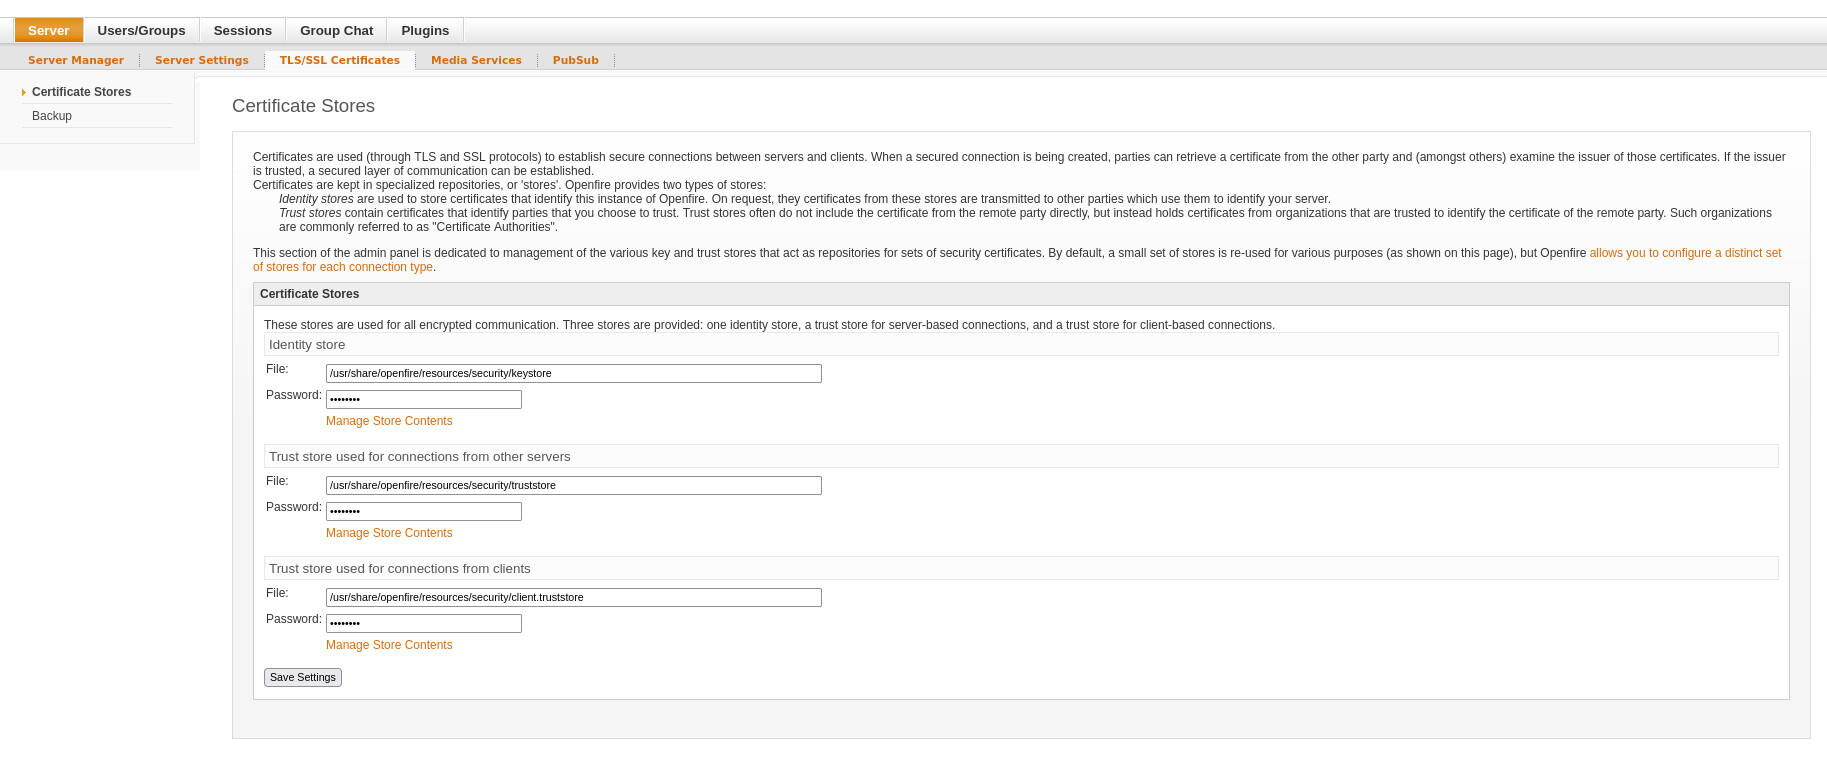
Configuring SSL for Openfire in the Admin console.
You now have an in-house chat server up and running for your staff.
Openfire is a reliable tool to help make collaboration and communication easier within your organization, without having to rely on a third-party service.
Subscribe to TechRepublic's How To Make Tech Work on YouTube for all the latest tech advice for business pros from Jack Wallen.

Open Source Weekly Newsletter
You don't want to miss our tips, tutorials, and commentary on the Linux OS and open source applications. Delivered Tuesdays
Sign up todayAlso see
- The best chat software for Linux, macOS and Windows isn't Slack (TechRepublic)
- 9 network commands every Linux admin should know (TechRepublic)
How to become a network administrator: A cheat sheet (TechRepublic)
5 programming languages network architects should learn (free PDF) (TechRepublic)
Hiring Kit: Network Architect (TechRepublic Premium)
5G: More must-read coverage (TechRepublic on Flipboard)


 English (US) ·