
Large Word documents are often sprinkled with references to information throughout a document. You can enter them manually, but they'll be hard to maintain later. Instead, use this simple technique.

Image: PixelMe/Shutterstock
You often see text that references information on another page that includes the page number. For instance, you might see something similar to "To read more on this topic, please see page 14." You could type the page number manually in Microsoft Word, but if you delete or add a page before page 14, that page number will be wrong. There's a simple way to protect page number references: Bookmark them and then use a cross-reference to refer to the bookmark. It's simple but does require a few steps. In this article, I'll show you how to bookmark referenced text and then use a cross-reference to display the bookmark's page number.
SEE: 83 Excel tips every user should master (TechRepublic)
I'm using Microsoft 365 on a Windows 10 64-bit system, but you can use older versions. You can create the example document or download the demonstration .docx and .doc files. This article isn't appropriate for Word Online.
How to reference a page number in Word
Referencing a page number takes a few steps, but they're not difficult:
- Add a page numbering scheme to a document's header or footer. This step isn't necessary, but in an example, it helps to see the page numbers.
- Enter the referenced text and bookmark it.
- Enter a cross reference that uses the bookmark.
Don't worry if you don't know some of the terms yet; you will by the time we're done. We'll be working with a mostly empty document that contains three pages so you can see the page number update when you add a page, which brings me to the only downside to this method: If you add or delete enough content that the referenced content moves to another page, you must manually update the cross-reference. It won't update on its own. We'll discuss this in more detail later.
1. Enter a page-numbering scheme
First, we need a document. Open a new blank document and use Ctrl+Enter to force two extra pages for a total of three pages. To add the page-numbering scheme, do the following:
- Open the header area of any page (double-click the top margin) so you can edit the header.
- To add a page-numbering scheme, click Page Number in the Header & Footer.
- Choose the first item in the dropdown list then choose the first item in the resulting list (see Figure A).
When you return to the document, you'll see page numbers at the top of each page.
Figure A
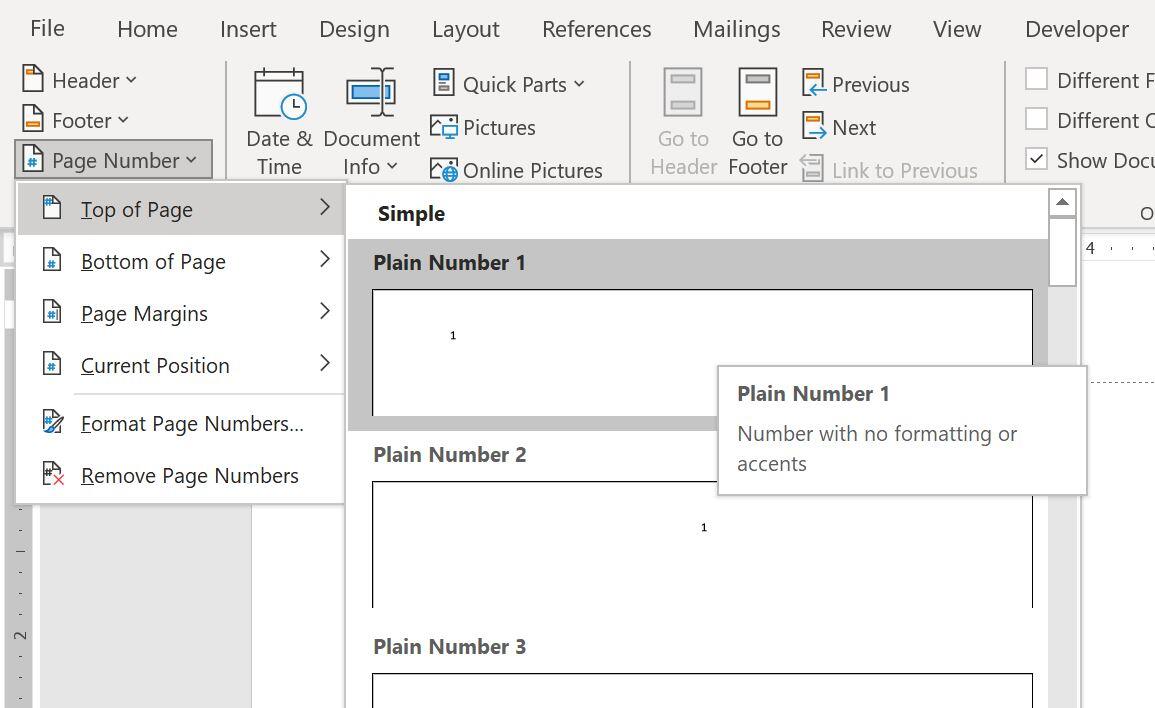
Add a page-numbering scheme.
This method will work with any built-in page-numbering scheme. We're using the easiest to simplify things. Now let's complete the next step.
2. Bookmark the referenced text
A bookmark is just what it sounds like. It's a marker that identifies content or location for future reference. In our case, we want to know the page number of referenced text. By bookmarking that text, we can get information about that content in other areas of the document.
By referenced text, I mean the content (usually text) that you want to refer to later. For example, on page 2 enter, "This is the information you want to reference." This is the information that might move from one page to another as you update, add, and delete content. You could bookmark a single word, a heading or the entire paragraph. Now, let's create that bookmark:
- Select the text (the entire sentence in this case).
- Click the Insert tab.
- From the Links group, click Links.
- Choose Bookmark.
- In the resulting dialog, give the bookmark a name, as shown in Figure B. Don't change any of the other settings; we want to identify this bookmark by name.
- Click Add.
Figure B

Name the bookmark.
You'll want to give bookmarks meaningful names so they're easier to discern and manage later. Next up is the cross-reference that will use this bookmark.
3. Create the cross-reference
Within Word, a cross-reference is a link to another part of a document. It's actually a field, { PageRef }, and you can enter and update it as you would any other field.
Our last step is to enter a cross-reference that links to the bookmarked content on page 2. We don't want to display the actual text. Instead, we want to display the page on which the bookmarked text resides.
On page 3 of the example document, enter the text "You'll find more information on page". Notice that I didn't type a page number. This is where we'll create the cross-reference as follows:
- Position the cursor between the word page and the period character at the end of the sentence you entered on page 3.
- Click the References tab and click Cross-Reference in the Captions group. (I know, it does seem an odd place for it.)
- In the resulting dialog, choose Bookmark from the Reference dropdown.
- From the Insert Reference To dropdown, choose Page Number—you want to display the page the bookmarked text is on, not the bookmarked text.
- In the For Which Bookmark list, select PageNumberReferenceBM, as shown in Figure C.
- Click Insert and then Close.
Figure C
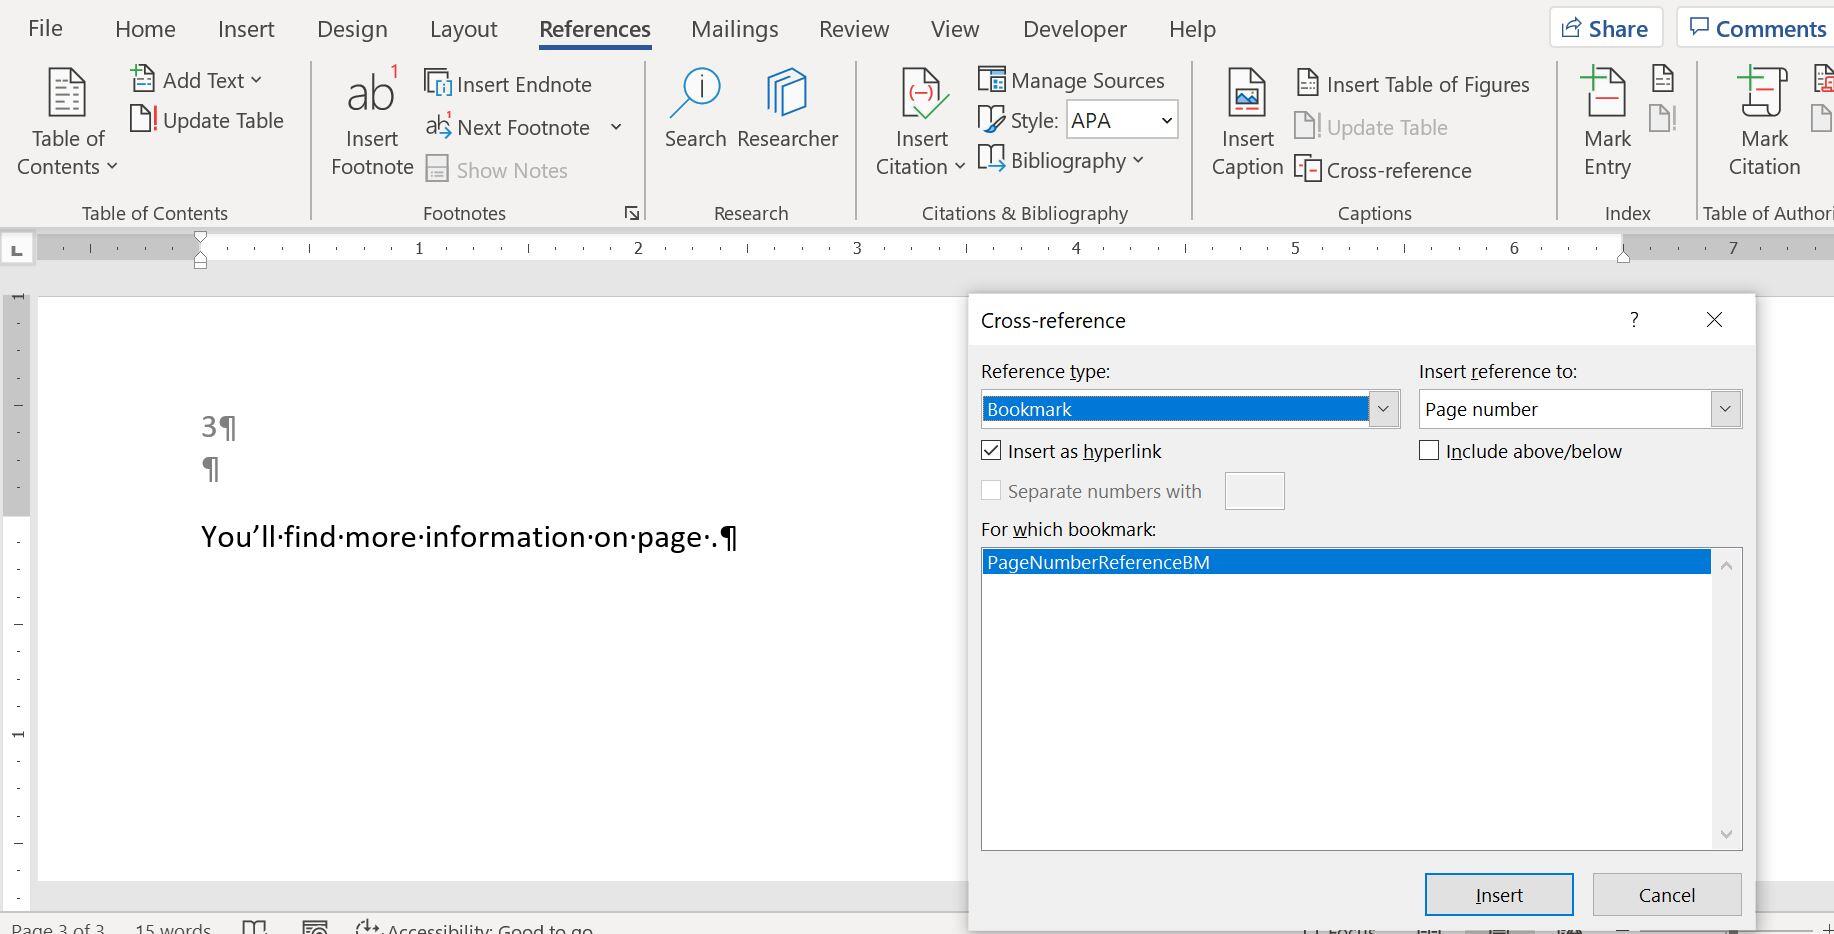
Choose a bookmark.
When you return to the document, the new cross-reference correctly displays 2, that's where the referenced (bookmarked) text is right now. At this point, all the pieces are in place. It's time to see how they all work together to always reference the right page, even if the page number changes.
How it all works together in Word
Initially, the cross-reference displays 2. What happens if you insert a page between 1 and 2, pushing the bookmarked content to page 3? Let's find out—go to page 1 and press Ctrl+Enter to insert a new page. Then thumb down to page 2, which is empty. This is the new page you inserted. Thumb down to page 3 and you'll find the bookmarked content. Finally, thumb down to page 4.
Are you surprised to see that it still displays 2 instead of 3? That's because, for better or worse, cross-references don't update automatically. You must update them. You can update all of them by pressing Ctrl+A to select the entire document and then pressing F9 to calculate all fields. If you want to calculate a single cross-reference, select that field individually and press F9. As you can see in Figure D, doing so updates the page number to 3.
Figure D
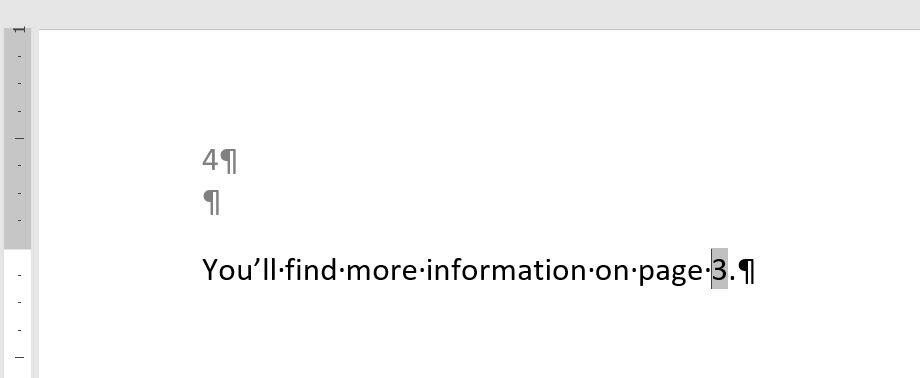
Update the cross-reference manually.
It seems like we've worked hard to update a page number that we could update manually, but what if you have lots of page numbers to update? You might miss one, and frankly, it's tedious work. Not to mention that weeks down the road, you won't remember to update the page numbers. Instead, bookmark and cross-reference those page numbers and let Word update them all as needed. In a future article, I'll show you a few macros that can update references for you.

Microsoft Weekly Newsletter
Be your company's Microsoft insider by reading these Windows and Office tips, tricks, and cheat sheets. Delivered Mondays and Wednesdays
Sign up todayAlso see
- How to make fewer mistakes and work more efficiently using predictive text in Microsoft 365 (TechRepublic)
- How to use the many text wrapping options in Microsoft Word (TechRepublic)
- Microsoft 365: A cheat sheet (TechRepublic)
- Zoom vs. Microsoft Teams, Google Meet, Cisco WebEx and Skype: Choosing the right video-conferencing apps for you (free PDF) (TechRepublic)
- Checklist: Securing Windows 10 systems (TechRepublic Premium)
- Everything you need to know about the Microsoft Exchange Server hack (ZDNet)
- Must-read coverage: Windows 10 (TechRepublic on Flipboard)


 English (US) ·